Mr.Anki Skrevet 22. juni 2007 Forfatter Rapporter Del Skrevet 22. juni 2007 SO6 er stengt vettu, så da kommer han med noen fine kommentarer her Lenke til kommentar
GrH Skrevet 22. juni 2007 Rapporter Del Skrevet 22. juni 2007 Hahahahah Ang den feilmeld dobbelt sjekke at du har rette drivere .. prøv og last ned på nytt ( Sånn viss det skulle ha hvert en error når du lastet ned du kan se det i opera viss du brukte det ) Fordi at chipsett driverene teller ganske mye viss du ikke har de inne da det er der alt går igjennom -Djgunnah Lenke til kommentar
Mr.Anki Skrevet 22. juni 2007 Forfatter Rapporter Del Skrevet 22. juni 2007 Det står at det er en ukjent enhet under enhetsbehandling. Maskinvare IDer: ACPI\ATK0110 *ATK0110 Hva er dette? Link til driver? Kjører XP pro 32bit. Lenke til kommentar
GrH Skrevet 22. juni 2007 Rapporter Del Skrevet 22. juni 2007 (endret) Se her Så under "select product" tar du "motherboard" Under " Select series " tar du "socket 775" Under " Select Models" tar du " P5B Deluxe/WiFi-AP" (det er det du har ja?) Så trykker du på den fine Search knappen da får du opp en ny side Trykker du på "drivers" så på andre linje er chipsett driverene ... -Djgunnah Endret 22. juni 2007 av Djgunnah Lenke til kommentar
Eivinde Skrevet 23. juni 2007 Rapporter Del Skrevet 23. juni 2007 Spennende at du er igang med hwen Lenke til kommentar
LockBreaker Skrevet 23. juni 2007 Rapporter Del Skrevet 23. juni 2007 Sett noe mer på overklokking eller? Og fungerer Chipset driverene? Lenke til kommentar
Mr.Anki Skrevet 23. juni 2007 Forfatter Rapporter Del Skrevet 23. juni 2007 Har ikke prøvd noe serlig på det, venter til kjølern kommer. Fant en driver på Intel sine sider, men vet ikke om den er rett. Har begynnt å pusse på fronten nå, håper på å komme langt med den i kveld. Lenke til kommentar
GrH Skrevet 23. juni 2007 Rapporter Del Skrevet 23. juni 2007 Prøvd oppskriften min ? Chipsett driverene skal lastes ned fra Hovedkort produsenten sine hjemme sider det er de som har best støtte da de er kun laget for det kortet ... -DJgunnah Lenke til kommentar
Mr.Anki Skrevet 23. juni 2007 Forfatter Rapporter Del Skrevet 23. juni 2007 (endret) Har prøvd det ja, men funker ikke Hvordan kan en skjekke om driveren er inne? Endret 23. juni 2007 av Mr.Anki Lenke til kommentar
Cortinarius rubellus Skrevet 23. juni 2007 Rapporter Del Skrevet 23. juni 2007 hvis du mener chipsett-drivern så står den under Intel og inni mappa er det en inf. fil, og sånn sjekker du det. Ligger vel på programfiles Lenke til kommentar
Mr.Anki Skrevet 23. juni 2007 Forfatter Rapporter Del Skrevet 23. juni 2007 Denne filen mener du? Er driveren på plass? Klikk for å se/fjerne innholdet nedenfor ************************************************************* Product: Intel® Chipset Software Installation Utility * Release: Production Version * Version: 8.0.1.1002 * Target Chipset(s)#: Q963/Q965/P965/G965 * Date: May 24 2006 ************************************************************ NOTE: For the list of supported chipsets, please refer to the Release Notes ************************************************************ * CONTENTS OF THIS DOCUMENT ************************************************************ This document contains the following sections: 1. Overview 2. System Requirements 3. Contents of the Distribution Package 4. List of Available Command Line Flag Options 5. Contents of the Extracted Files 6. Installing the Software in Interactive Mode 7. Installing the Software in Silent Mode 8. Installing the INF Files Prior to OS Installation 8A. Installing the Windows* 2000 INF Files Prior to OS Installation 8B. Installing the Windows* XP INF Files Prior to OS Installation 8C. Installing the Windows Server* 2003 INF Files Prior to OS Installation 9. Installing the INF Files After OS Installation 9A. Installing the Windows* 2000 INF Files After OS Installation 9B. Installing the Windows* XP INF Files After OS Installation 9C. Installing the Windows Server* 2003 INF Files After OS Installation 10. Verifying Installation of the Software and Identifying the Software Version Number 11. Troubleshooting ************************************************************ * 1. OVERVIEW ************************************************************ The Intel® Chipset Software Installation Utility installs Windows* INF files to the target system. These files outline to the operating system how to configure the Intel® chipset components in order to ensure that the following features function properly: - Core PCI and ISAPNP Services - PCIe Support - IDE/ATA33/ATA66/ATA100 Storage Support - SATA Storage Support - USB Support - Identification of Intel® Chipset Components in the Device Manager This software can be installed in three modes: Interactive, Silent and Unattended Preload. Interactive Mode requires user input during installation; Silent Mode and Unattended Preload do not. This software also offers a set of command line flags, which provide additional installation choices. The command line flags are not case sensitive. Refer to Section 4 for detailed descriptions of these flags. Important Note: The Intel® Chipset Software Installation Utility is distributed in two formats: self extracting .EXE files (INFINST_AUTOL.EXE) or compressed .ZIP files (INFINST_AUTOL.ZIP). Depending on which distribution format is being executed, the command-line syntax may differ. Refer to Section 4 for more details. ************************************************************ * 2. SYSTEM REQUIREMENTS ************************************************************ 1. Please refer to the Release Notes to view the list of chipsets that the software included with this distribution package is designed to operate with. 2. One of the following operating systems must be fully installed and running on the system before installing this software: Microsoft Windows* Server 2003 with Service Pack 1 Microsoft Windows Server 2003 x64 Edition* Microsoft Windows XP Professional x64 Edition Microsoft Windows XP with Service Pack 2 Microsoft Windows 2000 with Service Pack 4 NOTE: This software is designed for the latest service pack releases of above operating systems. To verify which operating system has been installed onto the target system, follow the steps below: a. Click on Start. b. Select Settings. c. Select Control Panel. d. Double-click on the System icon. e. Click on the General system properties tab. f. Verify which OS has been installed by reading the System information. 3. It is recommended that the software be installed on systems with at least 64MB of system memory when using Windows* 2000, Windows* XP and Windows Server* 2003. 4. It is recommended that there be a minimum of 5MB of hard disk space on the system in order to install this software. 5. The operating system must be fully installed and running on the system before running this software. 6. Close any running applications to avoid installation problems. 7. It is recommended that the Intel® Chipset Software Installation Utility be installed onto the target system prior to the installation of other drivers. Please check with the system provider to determine which operating system and Intel® chipset are used in the system. ************************************************************ * 3. CONTENTS OF THE DISTRIBUTION PACKAGE ************************************************************ The Intel® Chipset Software Installation Utility package contains the following items: File(s) ------- INFINST_AUTOL.EXE -or- INFINST_AUTOL.ZIP README.TXT, RELEASE_xxx.HTM *** NOTE: Only the files that reference the currently detected devices are copied to the system. If the -A option is exercised, the files are not copied to the <Windows>\INF directory. Refer to Section 4 for more information. ************************************************************ * 4. LIST OF AVAILABLE COMMAND LINE FLAG OPTIONS ************************************************************ The Intel® Chipset Software Installation Utility supports several command line flags for various installation options. Due to the different distribution formats available for the Intel® Chipset Software Installation Utility, the command line flag syntax may vary: 1. Self-Extracting .EXE Distribution: When installing this software using the .EXE distribution, an extra '-A' must be appended to the INFINST_AUTOL.EXE program call (i.e. INFINST_AUTOL.EXE -A) in order to successfully pass command line flags. NOTE: The extra '-A' flag for the self-extracting .EXE package is different from the '-A' command line flag option described under Compressed .ZIP Distribution. Example: To extract INF files using the '-A' flag described below, the installation program should be invoked as follows: INFINST_AUTOL.EXE -A -A (optional -P) 2. Compressed .ZIP Distribution: When installing this software using the .ZIP distribution, use the command line flags exactly as described below. Example: To extract INF files using the '-A' flag described below, the installation program should be invoked as follows: SETUP.EXE -A (optional -P) Below is a list of all the available command line flags that may be used with the program call. Note that the '-L' and the '-S' flags MUST be specified at the end of the command line flag list. Flag Description ---- ----------- -? Displays the list of available command line flags. This flag works in Interactive Mode only. -A Extracts all the INF files and Readme to either "C:\Program Files\Intel\InfInst" or the <Installation Path> directory specified using the '-P' flag. The software will NOT install these INF files to the system. This flag can be combined only with the '-P' flag. All other options will be ignored if the '-A' flag is specified. This flag works in Interactive Mode only. -Aonly Extracts only the INF files necessary for the current system. If the install has been run once successfully, '-Aonly' will not return any INFs. When used in conjunction with '-overall' switch, all the needed INFs for the system will be extracted. -B Automatically reboots the system after installation. This flag is ignored if '-A' flag is specified. This flag works in either Silent Mode or Interactive Mode. -f2<path\Logfile> Specifies an alternate location and name of the log file created by InstallShield Silent. This option is used for silent installation from a CD. 'Path' indicates the directory path where installation status is logged in file 'Logfile' -L<LangCode> Forces the installer user interface to display the specified language during setup. Note that there should be NO space between '-L' and the 4-digit language code (see below). This flag must be placed at the end of the command line flag list. This flag works in Interactive Mode only. -NOLIC Does not display the license agreement dialog box during installation. This parameter works in Interactive Mode only. -NOREAD Does not display the Readme display during installation. This flag works in Interactive Mode only. -NOWEL Does not display the welcome screen during installation. This flag works in Interactive Mode only. -OVERALL Updates ALL INF drivers on all available devices even if third party drivers are currently installed. This flag works in Interactive Mode only. -OVERIDE Updates the storage drivers even if a third party storage driver is currently installed. This flag works in Interactive Mode only. -OVERSMB Updates the SMBus drivers even if third party SMBus drivers are currently installed. This flag works in Interactive Mode only. -P<Installation Path> Specifies the hard disk location to which the INF program files are copied. If this flag is not specified at the command line, the <Installation Path> directory is as follows: C:\Program Files\Intel\INFInst If this flag is used without the '-A' option, only the Readme will be copied to <Installation Path>. The directory name can include spaces, but then a pair of double quotes (") must enclose the directory name. There should not be any space between the switch '-p' and the directory name. This flag works in either Silent Mode or Interactive Mode. -S Runs the Installer in Silent Mode (no user interface is displayed). This flag and the '-L' flag must be placed at the end of the command line flag list. -SKIP<DevID> Suppresses the installation of one or more devices.This flag works in either Silent Mode or Interactive Mode. Below are the language codes used with the '-L' flag: <LangCode> Language -------- ---------- 0001 Arabic (International) 0804 Chinese (Simplified) 0404 Chinese (Traditional) 0005 Czech 0006 Danish 0013 Dutch 0009 English (United States) 000B Finnish 040C French (International) 0007 German 0008 Greek 000D Hebrew 000E Hungarian 0010 Italian 0011 Japanese 0012 Korean 0014 Norwegian 0015 Polish 0416 Portuguese (Brazil) 0816 Portuguese (Standard) 0019 Russian 000A Spanish (International) 001D Swedish 001E Thai 001F Turkish ************************************************************ * 5. CONTENTS OF THE EXTRACTED FILES ************************************************************ INF files are copied to the hard disk after running the Intel® Chipset Software Installation Utility executable with an '-A' flag (i.e., "INFINST_AUTOL.EXE -A -A" or "SETUP.EXE -A"). The location of the INF files depends on whether a '-P' flag is specified along with the '-A' flag: 1. If a '-P' flag is not specified, then the INF files are copied to the following directory: "C:\Program Files\Intel\INFINST" 2. If a '-P' flag is specified, then the INF files are copied to the location listed immediately after the '-P' flag. Refer to Section 4 for more information on flag usage. After INF file extraction, the INF files and components are copied to the <INF Extract Directory>. These files and components are categorized according to the operating system. The following table summarizes the locations of the INF files by operating system: The directories are classified according to the operating system that they are designed for: Win2000\ Contains INF files designed for Windows* 2000 ONLY. XP\ Contains INF files designed for Windows* XP ONLY. Win2003\ Contains INF files designed for Windows Server* 2003 ONLY. NOTE: The sub directories (e.g. SP) contains special INFs. NOTE: INFAnswr.TXT makes a CUSTOM.INF template that installs the INF files for Intel® chipsets during operating system setup. OEMs can incorporate this file into the Setup directory for the OEM Preload Kit. (Refer to Section 8 for more details.) ************************************************************ * 6. INSTALLING THE SOFTWARE IN INTERACTIVE MODE ************************************************************ 1. Verify that all system requirements have been met as described in Section 2 above. 2. Run the installation program: Self-extracting .EXE distribution: INFINST_AUTOL.EXE Compressed .ZIP distribution: SETUP.EXE 3. You will be prompted to agree to the license agreement. If you do not agree, the installation program will exit before extracting any files. 4. Once the operating system reboots, follow the on-screen instructions and accept default settings to complete the setup. ************************************************************ * 7. INSTALLING THE SOFTWARE IN SILENT MODE ************************************************************ 1. Verify that all system requirements have been met as described in section 2. 2. Run the installation program: For silent install with auto-reboot: Self-extracting .EXE distribution: INFINST_AUTOL.EXE -a -b -s Compressed .ZIP distribution: SETUP.EXE -b -s - or - For silent install without auto-reboot: Self-extracting .EXE distribution: INFINST_AUTOL.EXE -a -s Compressed .ZIP distribution: SETUP.EXE -s 3. The utility will perform the necessary updates and record the installation status in the following system registry key: HKEY_LOCAL_MACHINE\Software\Intel\INFInst 4. If the utility was invoked with the "-b" flag, the system will automatically reboot if the update was successful. NOTE: The system MUST be rebooted for all device updates to take effect. 5. To determine whether the install was successful, verify the "install" value in the registry key specified in Step 3. 6. In Silent Mode the utility will not display the license agreement. When using Silent Mode the license agreement, license.txt, will be placed in the following folder: Program Files/Intel/INFInst folder. Please read this agreement. The following describes the various parameters: Name: "install" Type: String Data: "success" The installation was successful. Data: "fail" The installation was not successful. No INF files were copied to the system. Name: "reboot" Type: String Data: "Yes" A reboot is required to complete the installation. Data: "No" No reboot is required to complete the installation. Name: "version" Type: String Data: <varies> Current version number of the Intel® Chipset Software Installation Utility ************************************************************ * 8. INSTALLING THE INF FILES PRIOR TO OS INSTALLATION ************************************************************ This procedure requires a minimum of 5MB of hard disk space. It is important to make sure there is enough disk space before beginning the copy process. Copy the operating system installation files from the setup directory to a directory on the hard disk. This can be done by opening 'My Computer', right-clicking on the correct drive, and selecting 'Properties'. The directories shall be referred to as follows: Windows* 2000 : <WIN2000 Setup Directory> Windows* XP : <XP Setup Directory> Windows Server* 2003 : <WIN2003 Setup Directory> ************************************************************ * 8A. INSTALLING THE WINDOWS* 2000 INF FILES PRIOR TO * OS INSTALLATION ************************************************************ NOTE: The Windows* 2000 OEM Preload Kit distribution CD contains a setup directory with all the base operating system setup files and installation programs (WINNT.EXE and WINNT32.EXE). The name of the directory may vary depending on the distribution CD (e.g., \I386\). 1. Create the following directory structure under the <WIN2000 Setup Directory>: \$OEM$\$$\INF 2. Copy the Windows* 2000 INF files from <INF Extract Directory>\Win2000 to the directory created in Step 1 above: <WIN2000 Setup Directory>\$OEM$\$$\INF 3. Create the following directory structure under the <WIN2000 Setup Directory>: \$OEM$\$1\drivers\IntelINF 4. Copy the Windows* 2000 INF files and the catalog files (.CAT) from <INF Extract Directory>\Win2000 to the directory created in Step 3 above: <WIN2000 Setup Directory>\$OEM$\$1\drivers\IntelINF 5. Either modify the default Windows* 2000 installation answer file, UNATTEND.TXT, located in <WIN2000 Setup Directory>, or create a customized answer file. The answer file must include the following information: [unattended] OemPreinstall = Yes OemPnPDriversPath="drivers\IntelINF" A sample answer file for preloading the Intel® Chipset Software Installation utility files is available at: <INF Extract Directory>\Win2000\INFAnswr.TXT For more information about Windows* 2000 answer files and unattended installations, please refer to the Microsoft* Windows* 2000 Guide to Unattended Setup. If you are a computer manufacturer, refer to the Microsoft Windows* 2000 OEM Preinstallation Kit (OPK) User Guide for more information about the \$OEM$ folder. Otherwise, refer to the Microsoft Windows* 2000 Deployment Guide. 6. Run "WINNT.EXE /u:<answer file name> /s:<WIN2000 Setup Directory>" to install Windows* 2000. ************************************************************ * 8B. INSTALLING THE WINDOWS* XP INF FILES PRIOR TO * OS INSTALLATION ************************************************************ NOTE: The Windows* XP OEM Preload Kit distribution CD contains a setup directory with all the base operating system setup files and installation programs (WINNT.EXE and WINNT32.EXE). The name of the directory may vary depending on the distribution CD (e.g., \I386\). 1. Create the following directory structure under the <WINXP Setup Directory>: \$OEM$\$$\INF 2. Copy the Windows* XP INF files from <INF Extract Directory>\XP to the directory created in Step 1 above: <WINXP Setup Directory>\$OEM$\$$\INF 3. Create the following directory structure under the <WINXP Setup Directory>: \$OEM$\$1\drivers\IntelINF 4. Copy the Windows* XP INF files AND the catalog files (.CAT) from <INF Extract Directory>\XP to the directory created in Step 3 above: <WINXP Setup Directory>\$OEM$\$1\drivers\IntelINF 5. Either modify the default Windows* XP installation answer file, UNATTEND.TXT, located in <WINXP Setup Directory>, or create a customized answer file. The answer file must include the following information: [unattended] OemPreinstall = Yes OemPnPDriversPath="drivers\IntelINF" A sample answer file for preloading the Intel® Chipset Software Installation utility files is available: <INF Extract Directory>\XP\INFAnswr.TXT If you are a computer manufacturer, refer to the Microsoft* Windows* XP Guide to Unattended Setup for more information about Windows* XP answer files and unattended installations. For more information about the \$OEM$ folder, refer to the Microsoft Windows* XP OEM Preinstallation Kit (OPK) User Guide. If you are not a manufacturer, refer to the Microsoft Windows* XP Deployment Guide. 6. Run "WINNT.EXE /u:<answer file name> /s:<WINXP Setup Directory>" to install Windows* XP. ************************************************************ * 8C. INSTALLING THE WINDOWS SERVER* 2003 INF FILES PRIOR * TO OS INSTALLATION ************************************************************ NOTE: The Windows Server* 2003 OEM Preload Kit distribution CD contains a setup directory with all the base operating system setup files and installation programs (WINNT.EXE and WINNT32.EXE). The name of the directory may vary depending on the distribution CD (e.g., \I386\). 1. Create the following directory structure under the <WIN2003 Setup Directory>: \$OEM$\$$\INF 2. Copy the Windows Server* 2003 INF files from <INF Extract Directory>\Win2003 to the directory created in Step 1 above: <WIN2003 Setup Directory>\$OEM$\$$\INF 3. Create the following directory structure under the <WIN2003 Setup Directory>: \$OEM$\$1\drivers\IntelINF 4. Copy the Windows Server* 2003 INF files and the catalog files (.CAT) from <INF Extract Directory>\Win2003 to the directory created in Step 3 above: <WIN2003 Setup Directory>\$OEM$\$1\drivers\IntelINF 5. Either modify the default Windows Server* 2003 installation answer file, UNATTEND.TXT, located in <WIN2000 Setup Directory>, or create a customized answer file. The answer file must include the following information: [unattended] OemPreinstall = Yes OemPnPDriversPath="drivers\IntelINF" A sample answer file for preloading the Intel® Chipset Software Installation utility files is available: <INF Extract Directory>\Win2003\INFAnswr.TXT For more information about Windows Server* 2003 answer files and unattended installations, please refer to the Microsoft Windows Server* 2003 Guide to Unattended Setup. If you are a computer manufacturer, refer to the Microsoft Windows Server* 2003 OEM Preinstallation Kit (OPK) User Guide for more information about the \$OEM$ folder. Otherwise, refer to the Microsoft Windows Server* 2003 Deployment Guide. 6. Run "WINNT.EXE /u:<answer file name> /s:<WIN2003 Setup Directory>" to install Windows* 2000. ************************************************************ * 9. INSTALLING THE INF FILES AFTER OS INSTALLATION ************************************************************ ************************************************************ * 9A. INSTALLING THE WINDOWS* 2000 INF FILES AFTER OS * INSTALLATION ************************************************************ Some Intel® chipset platforms already are supported by Windows* 2000, so it may not be necessary to use the INF files provided by this software to update Windows* 2000. The following steps describe the installation process of the Windows* 2000 INF files. You may need to repeat these steps to update all Intel® chipset devices not supported by Windows* 2000. 1. Copy the contents of the <INF Extract Directory>\Win2000 directory to the root directory of the floppy disk (A:\). 2. Close all programs currently running on the system. 3. Click on Start. 4. Select Settings. 5. Select Control Panel. 6. Double-click on the System icon. 7. Click on the Hardware tab. 8. Click on the Device Manager button. 9. Select "Devices by connection" under the View menu. 10. Click on MPS Uniprocessor PC -OR- MPS Multiprocessor PC. NOTE: Only one of the above items will be displayed for a given system. 11. Click on PCI bus. 12. Right-click on the line containing the description PCI standard host CPU bridge -or- PCI standard ISA bridge -or- PCI standard PCI-to-PCI bridge -or- PCI System Management Bus -or- Standard Dual PCI IDE Controller -or- Standard Universal PCI to USB Host Controller (This line will be selected.) 13. Select Properties from the pull-down menu. 14. Click on the Driver tab. 15. Click on the Update Driver button. 16. Windows* 2000 will launch the Upgrade Device Driver Wizard. Select Next. 17. Ensure that the following choice is selected: Search for a suitable driver for my device (recommended) 18. Insert the floppy containing the Windows* 2000 INF files into the floppy drive. 19. Select Next. 20. Windows* 2000 will list locations from where the updated driver file can be found. Ensure that the following choice is selected: Floppy disk drives 21. Select Next. 22. Windows* 2000 should report that a driver has been found: (The detected device name will be displayed.) Select Next. 23. Select Finish. 24. Reboot the system when prompted to do so. ************************************************************ * 9B. INSTALLING THE WINDOWS* XP INF FILES AFTER OS * INSTALLATION ************************************************************ Some Intel® chipset platforms already are supported by Windows* XP so it may not be necessary to use the INF files provided by this software to update Windows* XP. The following steps describe the installation process of the Windows* XP INF files. You may need to repeat these steps to update all Intel® chipset devices not supported by Windows* XP. 1. Copy the contents of the <INF Extract Directory>\XP directory to the root directory of the floppy disk (A:\). 2. Close all programs currently running on the system. 3. Click on Start. 4. Select Settings. 5. Select the Control Panel. 6. Double-click on the System icon. 7. Click on the Hardware tab. 8. Click on the Device Manager button. 9. Select "Devices by connection" under the View menu. 10. Click on MPS Uniprocessor PC -OR- MPS Multiprocessor PC. NOTE: Only one of the above items will be displayed for a given system. 11. Click on PCI bus. 12. Right-click on the line containing the description PCI standard host CPU bridge -or- PCI standard ISA bridge -or- PCI standard PCI-to-PCI bridge -or- PCI System Management Bus -or- Standard Dual PCI IDE Controller -or- Standard Universal PCI to USB Host Controller (This line will be selected.) 13. Select Properties from the pull-down menu. 14. Click on the Driver tab. 15. Click on the Update Driver button. 16. Windows* XP will launch the Upgrade Device Driver Wizard. Select Next. 17. Ensure that the following choice is selected: Search for a suitable driver for my device (recommended) 18. Insert the floppy containing the Windows* XP INF files into the floppy drive. 19. Select Next. 20. Windows* XP will list locations from where the updated driver file can be found. Ensure that the following choice is selected: Floppy disk drives 21. Select Next. 22. Windows* XP should report that a driver has been found: (The detected device name will be displayed.) Select Next. 23. Select Finish. 24. Reboot the system when prompted to do so. ************************************************************ * 9C. INSTALLING THE WINDOWS SERVER* 2003 INF FILES AFTER * OS INSTALLATION ************************************************************ Some Intel® chipset platforms already are supported by Windows Server* 2003 so it may not be necessary to use the INF files provided by this software to update Windows Server* 2003. The following steps describe the installation process of the Windows* XP INF files. You may need to repeat these steps to update all Intel® chipset devices not supported by Windows Server* 2003. 1. Copy the contents of the <INF Extract Directory>\Win2003 directory to the root directory of the floppy disk (A:\). 2. Close all programs currently running on the system. 3. Click on Start. 4. Select Settings. 5. Select the Control Panel. 6. Double-click on the System icon. 7. Click on the Hardware tab. 8. Click on the Device Manager button. 9. Select "Devices by connection" under the View menu. 10. Click on MPS Uniprocessor PC -OR- MPS Multiprocessor PC. NOTE: Only one of the above items will be displayed for a given system. 11. Click on PCI bus. 12. Right-click on the line containing the description PCI standard host CPU bridge -or- PCI standard ISA bridge -or- PCI standard PCI-to-PCI bridge -or- PCI System Management Bus -or- Standard Dual PCI IDE Controller -or- Standard Universal PCI to USB Host Controller (This line will be selected.) 13. Select Properties from the pull-down menu. 14. Click on the Driver tab. 15. Click on the Update Driver button. 16. Windows Server* 2003 will launch the Upgrade Device Driver Wizard. Select Next. 17. Ensure that the following choice is selected: Search for a suitable driver for my device (recommended) 18. Insert the floppy containing the Windows Server* 2003 INF files into the floppy drive. 19. Select Next. 20. Windows Server* 2003 will list locations from where the updated driver file can be found. Ensure that the following choice is selected: Floppy disk drives 21. Select Next. 22. Windows Server* 2003 should report that a driver has been found: (The detected device name will be displayed.) Select Next. 23. Select Finish. 24. Reboot the system when prompted to do so. ************************************************************ * 10. IDENTIFYING THE SOFTWARE VERSION NUMBER ************************************************************ The version numbers displayed by Device Manager for a given device may not be the same as the Intel® Chipset Software Installation Utility version. The correct version number is shown at the top of this file. ************************************************************ * 11. TROUBLESHOOTING ************************************************************ It is assumed that the system requirements in Section 2 above have been satisfied. Issue: At the end of executing the Chipset Software Installation Utility, the USB keyboard and mouse will stop functioning. This problem only occurs when using Windows XP with SP1 or Windows 2000 Server with SP4 on a system configured with a USB keyboard and/or mouse. This condition is temporary until a system reset. Solution1: A recommended fix has been provided by Microsoft in Knowledge Base article(822603). For additional information, please refer to the KB article located at http://support.microsoft.com/default.aspx?scid=kb;[LN];822603 Please use the following installation procedures: - Windows XP installed with SP1 - QFE (822603) installed - Latest Chipset Utility Software installed. Solution2: The command line flag "-Skip <DevID>" can be used with the Intel® Chipset Software Installation Utility program to cause the USB2 driver not to be installed. The DevID's for ICH4/ICH5 are 24CD/24DD. This will cause the USB2 controller to have a yellow exclamation point in Device Manager (Usually located under Other Devices and identified as "Universal Serial Bus (USB) Controller"). To install the USB2 driver right-click this entry, select update driver, and allow the system to install automatically. When completed, nothing more should be required. Issue: System locks up during Device Manager Remove or during restart. Solution: System lockup can occur during reboot as a result of several possible system issues. In the event of system lockup, reboot the machine and view Device Manager. If devices are listed properly and the system experiences no further problems, then the .INF file restore process was successful. If devices are not configured correctly, try re-running the procedures outlined in Section 3. If this does not fix the issue or further issues are experienced, reinstall the operating system. Issue: After running the setup program and rebooting the machine, Windows reports that it cannot find one of the following files: ESDI_506.pdr Solution: Click Browse in the dialog box where this issue occurs, locate the <Windows>\System\IOSubsys directory. Click OK. The system should be able to locate this file in this directory and continue re-enumerating for the new devices. Issue: After running the setup program and rebooting the machine, Windows reports that it cannot find one of the following files: UHCD.SYS USBD.SYS USBHUB.SYS Solution: Click Browse in the dialog box where this issue occurs and locate the following directory: <Winnt>\System32\drivers Click OK. The system should be able to locate the files in this directory and continue re-enumerating for the new devices. Issue: After running the setup program and rebooting the machine, Windows reports that it cannot find the following file: ISAPNP.VXD Solution: Click Browse in the dialog box where this issue occurs and locate the <Winnt>\System directory. Click OK. The system should be able to locate this file in this directory and continue re-enumerating for the new devices. Issue: After performing the silent install, the HKLM\Software\Intel\InfInst key was not created or the data of the value "install" is not "success". Solution: This is caused by one of the following scenarios: - The current system does not contain a supported operating system, or -or- - The current system does not contain a supported chipset. Verify that the System Requirements are met as outlined in Section 2. ************************************************************ * DISCLAIMER ************************************************************ Intel is making no claims of usability, efficacy or warranty. The Intel® SOFTWARE LICENSE AGREEMENT (OEM / IHV / ISV Distribution & Single User) completely defines the licensed use of this software. ************************************************************ Information in this document is provided in connection with Intel® products. No license, express or implied, by estoppel or otherwise, to any intellectual property rights is granted by this document. Intel assumes no liability whatsoever, and Intel disclaims any express or implied warranty relating to sale and/or use of Intel® products, including liability or warranties relating to fitness for a particular purpose, merchantability or infringement of any patent, copyright or other intellectual property right. Intel® products are not intended for use in medical, life saving, or life-sustaining applications. ************************************************************ Intel Corporation disclaims all warranties and liabilities for the use of this document and the information contained herein, and assumes no responsibility for any errors which may appear in this document, nor does Intel make a commitment to update the information contained herein. Intel reserves the right to make changes to this document at any time, without notice. ************************************************************ ************************************************************ * Intel is a trademark or registered trademark of Intel Corporation or its subsidiaries in the United States and other countries. * Other brands and names are the property of their respective owners. Copyright © Intel Corporation, 1997-2006 Lenke til kommentar
Cortinarius rubellus Skrevet 23. juni 2007 Rapporter Del Skrevet 23. juni 2007 (endret) yupp, men hvis du vil så er det nyere driver på windows.com til chipsettet Endret 23. juni 2007 av Fluesopp Lenke til kommentar
Mr.Anki Skrevet 23. juni 2007 Forfatter Rapporter Del Skrevet 23. juni 2007 Hva mener du med " hvis du vil gå "? Link til driveren? Lenke til kommentar
Cortinarius rubellus Skrevet 23. juni 2007 Rapporter Del Skrevet 23. juni 2007 http://www.intel.com/support/chipsets/sb/CS-022768.htm her Lenke til kommentar
Mr.Anki Skrevet 23. juni 2007 Forfatter Rapporter Del Skrevet 23. juni 2007 Nå fikk jeg iallefall kjørt gjennom intallasjonen. Vil jeg få et annet resultat i 3D Mark vis driveren er på plass? Lenke til kommentar
Cortinarius rubellus Skrevet 23. juni 2007 Rapporter Del Skrevet 23. juni 2007 det må du bare teste flott at det gikk. Lenke til kommentar
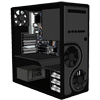
Mr.Anki Skrevet 23. juni 2007 Forfatter Rapporter Del Skrevet 23. juni 2007 Skal sette på en 3D mark nå, så får se hvordan resultatet blir. Framgang på kabinettet: Nå har jeg fått skjært ut hullet til PSU'en bak det ble jeg førnøyd med, skulle prøvd å fått tak i en PSU brakett, så vis noen har en slik til overs og vil donere den til possjektet mitt blir jeg kjempe glad. Mvh Mr.Anki Lenke til kommentar
KKake Skrevet 23. juni 2007 Rapporter Del Skrevet 23. juni 2007 Hmm... Har rester av et gammelt kabinett liggende ute her, og der tror jeg det skal være en PSU brakett, kan skjekke imorgen (eller senere idag da ) Lenke til kommentar
Mr.Anki Skrevet 24. juni 2007 Forfatter Rapporter Del Skrevet 24. juni 2007 Det er fint å høre, håper du finner en Lenke til kommentar
KKake Skrevet 24. juni 2007 Rapporter Del Skrevet 24. juni 2007 Beklager å møtte skuffe deg, men PSU brakketen var helt ødelagt, forvridd og fæl. Lenke til kommentar
Anbefalte innlegg
Opprett en konto eller logg inn for å kommentere
Du må være et medlem for å kunne skrive en kommentar
Opprett konto
Det er enkelt å melde seg inn for å starte en ny konto!
Start en kontoLogg inn
Har du allerede en konto? Logg inn her.
Logg inn nå